Preparing for a Garden Shed Move: Tools and Equipment You’ll Need

Moving a garden shed may seem daunting, but it can be a relatively straightforward process with the right tools and equipment. Homeowners often need to relocate their garden sheds for various reasons, such as a yard redesign, property sale, or simply wanting to rearrange their outdoor space. Understanding the necessary tools and equipment is crucial for a successful shed move, and this article aims to guide just that.
Catering specifically to homeowners, this in-depth article offers insights into the tools and equipment needed for an efficient shed move, whether it’s a DIY project or requires professional assistance. Additionally, the article will cover essential safety gear and provide step-by-step instructions to ensure a smooth and hassle-free relocation of the garden shed. Following the tips and advice provided, homeowners can confidently tackle the shed moving process and enhance their outdoor living space.
Assessing the Shed Moving Task
Before diving into the tools and equipment required, it’s crucial to assess the specific requirements of the shed move. Factors to consider include the size and weight of the shed, the distance it needs to be moved, and the area’s terrain. Additionally, it’s essential to check if the shed’s structure can withstand being moved. Hiring a professional shed moving company, such as Shiply, might be the best option if it’s a more oversized shed or if the move requires navigating challenging terrain. However, homeowners can tackle the shed-moving process for smaller sheds and simply move.
Essential Tools and Equipment
When preparing for a DIY shed move, having the right tools and equipment can make all the difference. The following items are crucial for a successful move:
- Pry bar or crowbar: A pry bar or crowbar is necessary to lift the shed off the ground and create space for moving equipment.
- Jack: A hydraulic or mechanical jack is needed to raise the shed, providing room for installing support beams or rollers.
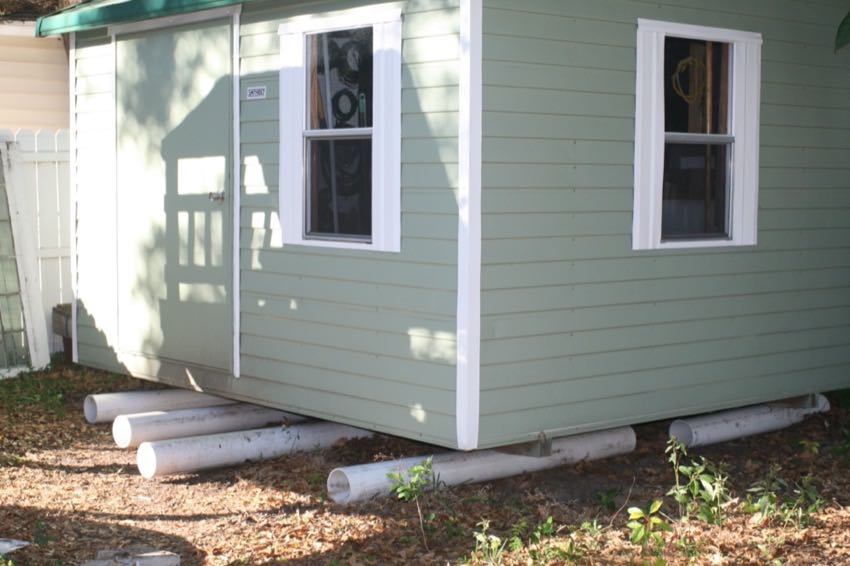
- Support beams or rollers create a stable platform for moving the shed. Beams can be made of lumber or steel, while rollers can be PVC pipes or commercial furniture dollies.
- Heavy-duty straps or ropes: To secure the shed during the move, use heavy-duty straps or ropes to ensure it stays in place.
- Hand truck or dolly: A hand truck or dolly can transport the structure for smaller sheds.
- Plywood or other protective material: To protect the ground or lawn from damage, place plywood or another protective material beneath the shed during the move.
Additional Equipment and Safety Gear

In addition to the essential tools, having some additional equipment and safety gear on hand can make the shed moving process safer and more efficient:
- Work gloves: Wear sturdy gloves to protect your hands from splinters and sharp edges.
- Safety glasses: Prevent eye injuries by wearing safety glasses while using tools or handling materials.
- Hammer and nails: For minor repairs or adjustments to the shed’s structure, have a hammer and nails on hand.
- Saw: If resizing the shed or modifying its structure, a saw helps cut lumber or other materials.
- Measuring tape: To ensure the shed will fit in its new location, use it to determine its dimensions and destination site.
- Level: A level will help ensure the structure is even and stable for releveling the shed in its new location.
- Shovels and rakes: These tools help prepare the ground at the new shed site and clean up debris after the move.
Steps for a Successful Shed Move
With the right tools and equipment in hand, follow these steps to ensure a smooth and efficient shed move:
- Prepare the shed: Empty the shed of all contents and remove any attached items, such as shelves or hooks. If the shed is on a concrete pad, disconnect any anchoring devices.
- Lift the shed: Using the pry bar, jack, and support beams or rollers, carefully lift the shed off the ground. Ensure the structure is stable and secure before proceeding.
- Attach straps or ropes: Fasten heavy-duty straps or ropes around the shed, creating handles to help guide the structure during the move.
- Move the shed: Slowly and carefully move it to its new location using either the support beams and rollers or a hand truck or dolly. Be mindful of any obstacles and the terrain, ensuring a smooth and controlled move.
- Prepare the new site: Level the ground at the new location, adding gravel or a concrete pad if necessary. Use shovels and rakes to create a stable, even surface for the shed.
- Lower the shed: Carefully lower it onto the ground using the jack and support beams or rollers once the shed is in its new location. Remove the straps or ropes and ensure the shed is level.
- Secure the shed: If the shed needs to be anchored, reinstall any anchoring devices, such as brackets or bolts. Then, make any necessary structural repairs or adjustments using the hammer, nails, and saw.
- Reinstall contents: After securing the shed, reinstall any shelves or hooks and return them to their proper places.
Final Thoughts on Shed Moving
Relocating a garden shed can be a manageable task for homeowners with the right tools, equipment, and planning. By assessing the shed moving requirements, assembling the necessary tools and safety gear, and following the outlined steps, homeowners can successfully move their garden sheds with minimal stress and hassle. In addition, the process not only allows homeowners to optimize their outdoor space and provides an opportunity to maintain and repair their sheds, thus prolonging their lifespan.
However, if the shed move involves a larger structure or challenging terrain, consider hiring a professional shed moving company like Shiply to ensure a safe and efficient relocation. Professionals have the expertise and specialized equipment to handle complex moves, reducing the risk of damage to the shed and surrounding property. This can ultimately save homeowners time, effort, and repair costs.
Regardless of the approach, preparing and gathering the appropriate tools and equipment is critical to a successful garden shed move. Proper preparation increases the chances of a smooth relocation and helps ensure the safety of all involved. It’s essential for homeowners to thoroughly assess their specific shed moving needs and choose the best course of action accordingly.
In conclusion, whether tackling a DIY shed move or enlisting the help of professionals, having a clear understanding of the required tools and equipment is crucial. With careful planning, attention to detail, and appropriate safety gear, homeowners can successfully relocate their garden sheds and continue to enjoy the benefits of their outdoor living space.